
Thursday, 30 September 2010
Wednesday, 29 September 2010
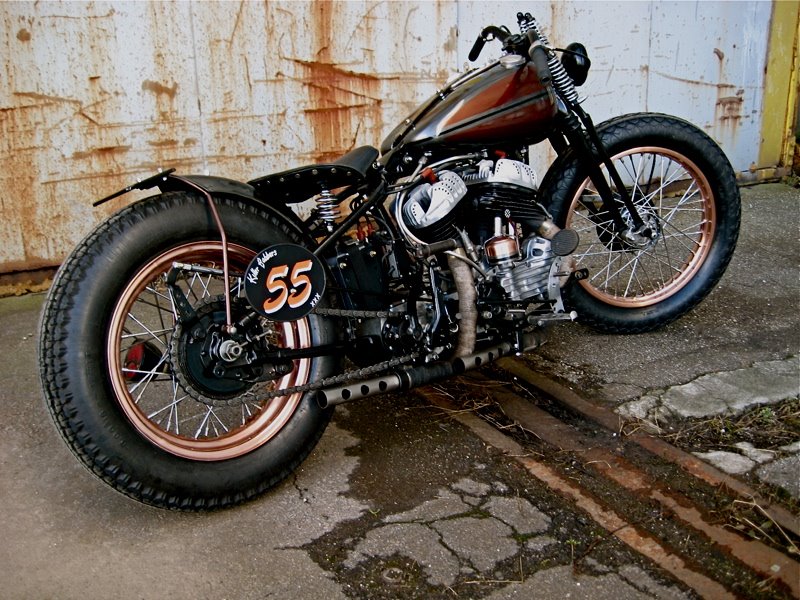
The Tins are back!
LoBoy Bobber Tins
I picked up the tins from Sharon & Jon at SIDS today...
http://www.specialistindesign.co.uk/.
Wow the Tanks and Fender have come out better than I could have ever imagined...
I picked up the tins from Sharon & Jon at SIDS today...
http://www.specialistindesign.co.uk/.
Wow the Tanks and Fender have come out better than I could have ever imagined...
 |
| Me picking up the tank from SIDS |
 |
| Decided against chroming the oil tank...I really like the pearl ivory paint to match the white wall tyres |
 |
| Ghosted Flame Effect Fuel Tank...Awsome |
 |
| More Ghosting and Pin Stripes |
 |
| A big big thank you guys. |
Tuesday, 28 September 2010


Monday, 27 September 2010
Wiring the Front End Part 1
LoBoy Bobber Blog
Im cracking on with the front end at the moment, getting the wiring together, drilling holes, fitting indicators, installing the handle bar switches etc.
Im cracking on with the front end at the moment, getting the wiring together, drilling holes, fitting indicators, installing the handle bar switches etc.
 |
| Fitting the switches was straight forward, just remember which is left and right!! |
 |
| I dont really want indicators, but I need them to get through the SVA test, I will have to put an orange filter over them. |
 |
| Drilled 4x 10mm holes in the handle bars to hide the switch wiring. |


Saturday, 25 September 2010
Headlamp & Speedo
Fitting the Headlamp and Speedo was straight forward. Again, lovely quality… I think the Headlight looks really cool. The hardest bit will be the wiring. Im going to drill holes in the handlebars and also in the frame soon…. and then start working out where im going to hide them all! The less wiring seen the better… keep that nice clean look.
LoBoy Bobber Blog Complete Motorcycle Bike Kit
 |
| Chromed Stretched Headlamp 1950's Style |
 |
| Dakota Digital Speedo |
 |
| The Blinkers are designed to fit to a round stock front end so I will have to mount mine higher just below the risers |
Friday, 24 September 2010

Thursday, 23 September 2010
Installing the Front End
Decided to start installing the front end this evening………..hmmmm, those bearings were tight!! I made up a bearing puller out of 10mm bar so I could slowly pull them in with lots of grease… took a few hours to get them seated…. I definitely wouldn’t want to get them out again!!
 The forks and bars are on and I think that ‘Old Springer’ looks really cool… offered the front wheel up to get an idea of how she will look.
 |
| The bearing & headcup, pack with lots of grease. |
 |
| Fitting the home made puller |
 |
| Tighten down the yoke |
 |
| Front end on... and staying on!! |

Wednesday, 22 September 2010

Army Bobbers
LoBoy Bobber
 Subject: Photos of Bobbers & Francesca from Chatham Docks War re-enactment last Weekend.


 |
| This girl loves to dress up!! |


 |
| Hat..... home made by Fran |
 |
| So many old bikes... heaven. |
The frames back from powdercoat
LoBoy Bobber Blog
Great news… I got the frame back from the powder coaters today, wow what a colour, and Im really impressed with that metallic finish. I can now start building the bike….. When I find some time!!
Great news… I got the frame back from the powder coaters today, wow what a colour, and Im really impressed with that metallic finish. I can now start building the bike….. When I find some time!!
 |
| Looks great in the sunshine. Frans just put the washing out!! |
 |
| Back on the bench... 1st job...I will start tapping out the un-wanted paint from all the holes, and also remove the paint from where the engine mounts. |
 |
| I would recommend Aerocoat in St Olaves, Nr Gt Yarmouth to anyone, two great guys running the shop...excellent service and on time... cost £200. |
Sunday, 19 September 2010
Another Old Sporty
 |
| Just checking out the archive’s and found another one of my old Sportys, bought this off Ebay and ran it for a couple of years.......great little bike, sounded great. |
Aaron Fishing
LoBoy Bobber Blog Complete Motorcycle Bike Kit
 |
| Think you might have seen these years ago buddy, but thought id post them for you anyway |
My Old Shovel
LoBoy Bobber Blog Complete Motorcycle Bike Kit
 |
| Remember this one Aaron, we dropped it with you on the back when you were about 8 years old!! Loved this beast, use to commute to London on it from Kent, I was buzzzzing by the time i got to work, 2hrs each way. |
Thursday, 16 September 2010
Forward Controls
Lo Boy
I starting fitting the Forward Controls together tonight, which includes the rear break cylinder, gear lever, and foot pegs etc. Im really impressed with the quality of this kit, the aluminium and stainless steel is highly polished and all the parts are quality and heavy. If you enjoying polishing.... this is the bike for you!!
 |
| I was short on two plastic washers which i got from Motor Man in the village. |

Monday, 13 September 2010

Sunday, 12 September 2010
Starting the Electrics
Lo Boy
Decided to get started on the electrics today (Sunday 12th September) while awaiting for the frame to come back from powder coat. The DVD was helpful, and it explains that you need to label all the wires from 1 to 36 and then decide which way they go… front or rear of the bike. As they will be running through the frame, its also really important to label the ends so you know exactly where there going. Ive removed wires 11,13 and 17 as they would go to an indicator panel. (i dont have one). I also have to order a seperate brake light module as I am mounting my brake light on the licence plate holder and not the fender. The book that comes with the wiring harness is user friendly, and it all seems quite straight forward. Might eat my words when I start to install everything!!
 |
| The harness, controller, labelling & dividing front and rear. |


Saturday, 11 September 2010

Friday, 10 September 2010
Thursday, 9 September 2010

Wednesday, 8 September 2010

Fitting the Breaks
Lo Boy
Well the frame and tins have gone off to be powder coated and painted and will take about 3 weeks so I'm going to crack on with what i can..... decided on a Metallic Kandy Blue for the frame and tank in the end. This bikes going to have BLING!
Well the frame and tins have gone off to be powder coated and painted and will take about 3 weeks so I'm going to crack on with what i can..... decided on a Metallic Kandy Blue for the frame and tank in the end. This bikes going to have BLING!
 |
| Cleaned up the white walls.......fitting the calipers |


Subscribe to:
Posts (Atom)