Monday, 25 October 2010

Fitting the Front Break Lines


Love the stainless steel rotors....sleek styling.... shims are provided so you can get the disc completely central to the pads.

Ive got a break bleed kit in the shed... a job for the spring!

The stainless steel brake lines come with the kit.... They already have the proper ends attached as an integral part of the line... just a matter of installing the banjo fittings.

Check out this link to buy this Bike on Ebay
Sunday, 24 October 2010

Running and Hiding those Wires


Started soldering the wires together below the fuel tank postion. (from handle bars to Harness Control Module).  Dipped the bare ends in flux and then 'tin' each end and cover in heat shrink

Engine wires for Ignition System etc

Engine wires exit below seat.... hardly seen
 
Hiding those wires under the seat.  Making sure I removed all the sharp bits around the holes using a file.....and protected the wiring with PVC tape and lots of thick heat shrink.

Up through the downtube.
Hidden under the fuel tank
Ready for connections
Handy book for wiring tips!
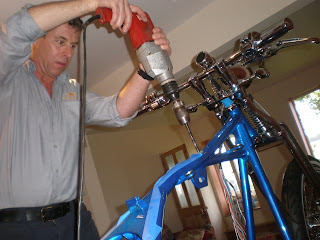
I carried on with some more wiring this weekend… that’s running the front end wiring from the Harness Controller (fitted below the Tranny) up through the backbone of the frame. It was a matter of drilling two 15mm holes….one in the frame and one below the seat. I was then able to feed the bulk of the wiring up into position where I can make all the connections below the fuel tank.

Theres more holes to come...... Ive still got the rear end wiring to hide!!


Saturday, 23 October 2010

Tuesday, 19 October 2010

Ape Hangers!!!!!!!!

Naahhhh, maybe not!!

Lucky Day!

LoBoy Bobber Blog Complete Motorcycle Bike Kit

Sissy Bar

Mine wont be quite so exaggerated!!

Before the sissy


I’ve decided to make a small sissy bar for the rear fender.... this will help pull the fender down to fit the tyre, and it will also give me somewhere to attach the rear indicators.


Thursday, 14 October 2010

Head Spin!!!


LoBoy Bobber Blog Complete Motorcycle Bike Kit

Wednesday, 13 October 2010

Skinny!


Not a true bob, but love that skinny back wheel and chopped fender!
 LoBoy Bobber Blog Complete Motorcycle Bike Kit

Tuesday, 12 October 2010

LoBoy Bobber


Another USA built Lo boy up for sale at $14,000

LoBoy Bobber Blog Complete Motorcycle Bike Kit

Lo Boy Built in Newzealand


Im getting Impatient!!!


Monday, 11 October 2010

To be 16 again!!


Happy Birthday Fran


Old Bob

Would love an old Indian like this......Nicked this of Phil Belinfante's blog   

http://belinfante-indian-motorcycles.blogspot.com/
LoBoy Bobber Blog Complete Motorcycle Bike Kit

Sunday, 10 October 2010

Finding a Location for the Micro Harness Controller

LoBoy Bobber Blog

The MHC should be mounted somewhere near the battery......... the DVD that comes with the kit shows it mounted at the back of the transmission, but this is for the ‘Chopper Kit’ with a big rear tyre and swingarm. It needs to be installed away from the hot engine and exhausts pipes. Reading ‘How to Build a Bobber on a Budget’ Jose installs his under the transmission……. So with the help from Tony (next door) we’ve made a steel plate and fitted the unit and the main circuit breaker directly below the tranny.

Drilling the holes to mount the home made bracket

Cutting the bracket


Fitting the circuit breaker


Im not planning on riding this bike in the wet.... the plate should give the unit some protection from moisture, heat or any vibration. With the Micro Harness Controller mounted, i can now plug the harness connector to the MHC.

Taking Off the Rear Wheel!!


Thanks Randy... the spacer ahhhhhh!

I thought id mock up the alignment through the rear chain and sproket and I found that the chain is very close to the tyre! Im still trying to rack by brains why this is. The rear wheels ‘set in stone’ because it lines up perfectly with the fixed fender!! and the tranny only moves forwards and backwards (not side ways) Ive emailed Randy at SMW to see if there are some spacers for the rear sprocket that im missing. I just need another 1/4 "

Installing the Rear Wheel

Installing the rear wheel was time consuming………… and you could do with about four pairs of hands! First I set the frame so the axle can slide through with out to much trouble. Ive measured the gaps each side of the wheel (they are different) and prepared which wheel spacers im going to use……..You must grease the axle now before slowly tapping it into place. This next bits fiddly, as you have to hold the spacers and break calliper in place while slowly tapping through the axle. The break calliper is held in place with a lug that is already welded onto the frame.
The kit comes with different sized wheel spacers... make sure the brake disc is perfectly aligned in the break shoes... ive secured the break caliper with a piece of wire while fiddling!

The fenders fixed using the spacers provided


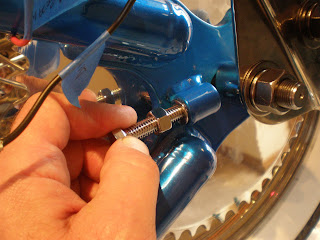
Tap out the paint and fit the axle adjusters

Checking the rear light..... remember to label the wires...one for break one for light

Happy with this... It will need some adjustments once I install the chain and transmission but basically its ready to go. Sids paints not perfectly alligned but im getting finicky now!
LoBoy Bobber Blog Complete Motorcycle Bike Kit

Tranny

The transmission came with a belt pulley attached...(I think SMW thought it was going in a chopper) so i had to remove this and fit the chain sprocket provided.


You need a bloody big socket (cheers Tony!!)

And remember its a reverse thread... we didnt .....................................zzzz!! Dont forget your red loctite.

Saturday, 9 October 2010

Motor Mounts

LoBoy

Any surface where there will be a bond (ground).. as the bolts are tightened, etc, need to be shaved or scrapped off.
Ive made a paper template for the Tranny mounts so i can cut and scrape the paint away before installing. Its easier and theres less chance of scratching the powder coating.

Monday, 4 October 2010

Harley Crash


LoBoy Bobber Blog Complete Motorcycle Bike Kit

My Old Commodore


My brother Phil just sent these of my old Opal Commodore straight 6, drove it from Plymouth to North Wales with the back wheels rubbing on the arches!! lots of burning rubber!!
(PIC FROM 1980'S ..NOT SURE ABOUT THEM TIGHT JEANS!!


Sunday, 3 October 2010

Rare Bike


Indian Bobber


LoBoy Bobber Blog Complete Motorcycle Bike Kit

Saturday, 2 October 2010

Wiring the Front End Part 2

Ive 95% completed the handlebars today. Switches installed and brake and throttle controls on. It was fiddly locating everything, but straight forward once you get your head round it. There were 12 wires in total to hide inside the bars. I have labelled them all and they will join the main harness under the fuel tank.


Spaghetti!!


Bars installed, wires hidden

Painting the Tins

LoBoy